|
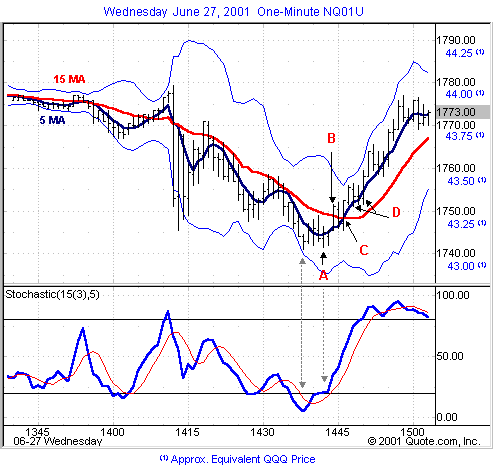
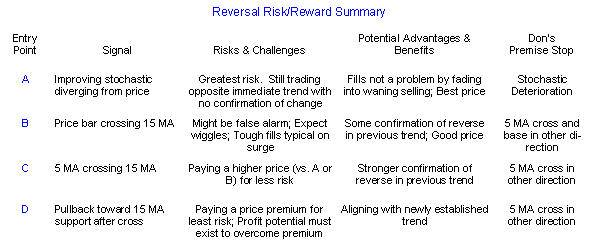
A.
Enter Upon Stochastic & Price Divergence (Highest
Risk)
As you may know, this is one of my favorite signals
when confirmed with follow through, as we have a testing of
another low on a strong downtrend, yet for the first time, we’re
seeing a strengthening low-band stochastic reading on the second
leg of a mini double-bottom at 14:38 and 14:42, indicating that
the strength of the remaining selling is waning. And if
selling has stopped, my 12-year-old will tell you that probability
shifts immediately to a likely turn. I of course stress
“if” in this scenario, as the primary risk is that trend
has not fully exhausted itself despite the strengthening
stochastic, and a dull knife can still be a knife.
Basically, this setup is analogous to a golf ball being teed up as
we wait to see if there are players interested in striking the
ball. Stops are critical upon any stochastic weakening.
So why the heck would I consider entering here without any
confirmation of follow-through? Did I sit a little too
close to the July 4 fireworks? Well, there are two very
valid reasons. First, there is far less competition for
fills as one is essentially “fading” into the market
(guess who the last few sellers are selling to?), and we all know
that fills can often be a great challenge upon confirmation, as is
the case with entry B below.
One also obtains a very good entry price, and carving out
wholesale/retail price differential is paramount when trading
intraday. Yet I would clearly consider this sort of an entry
only if I had extremely tight stop and reentry discipline,
and if I felt the earlier move set up enough potential for a
snapback profit that would exceed the accompanying risk.
B. Enter Upon Price Bar Penetrating
15 MA (Less Risk)
Here, we have at least some confirmed market interest in
the setup, as shown by a follow through in the price bar above the
15-MA, which is less risky than A
while still presenting a few challenges, including a possible false
alarm (see 14:20 and 14:33), and very tough fills as the whole
world jumps in — as seen in the height of the 14:44 price bar.
Wiggles would be expected given the immediate surge, and stops
necessary with any cross and base to the downside.
C. Enter Upon 5 MA Crossing 15 MA
(Lesser Risk)
This is perhaps the entry that best balances risk and reward as we
have further confirmed interest vs. A
and B, and attempted price
basing on the upside of the 15-MA as evidenced by the 5-MA cross.
The MA cross entry often avoids the false alarms that can be
generated by B, which is why a
MA cross following improving stochastics at the end of a strong
trend is my personal favorite reversal entry. As always,
stops remain critical and a MA cross back in the other direction
would trigger my protective exit.
D. Enter Upon Pullback on New Trend
(Least Risk)
This entry basically attempts to align oneself with the new trend
and is less of a reversal entry than an early trend entry.
The 15-MA which had been prior resistance now becomes support for
the new move until broken, which would again trigger a stop.
The earlier the pullback the better, as the farther the trend
continues we’ll start the dance all over again by beginning to
look for scenario A on the
other side.
As trading requires continual risk/reward assessment, there are
clear risk vs. price trade-offs associated with each entry.
Better prices and fills reflect additional risk, while one pays
varying price premiums to compensate for reduced levels of risk.
Using the example above, there was roughly a $0.25 price
differential on the Qs between entries A & D.
So
to summarize:
|